MINI2440

1 前言

為了學習 ARM LINUX 嵌入式作業系統的開發,筆者買了一塊 MINI2440 開發板。 此開發板可以使用 NFS 啟動 LINUX,這是一種很好的開發方式。

s3c2440

2 NFS 啟動 LINUX

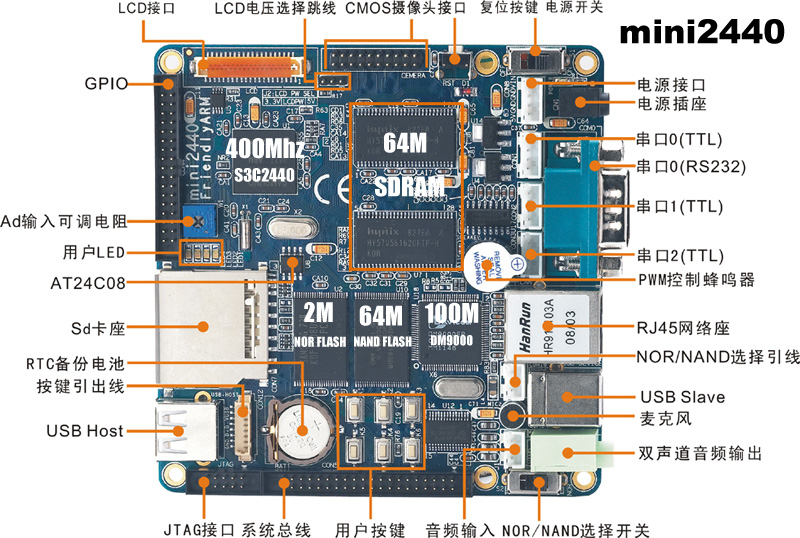
使用 NFS 啟動 LINUX 需要兩台電腦,一台執行 LINUX,一台執行 WINXP。 筆者使用 FEDORA 15 作為 LINUX 平台,在 LINUX 上必須關閉防火牆並啟動 NFS。 在 WINXP 上,使用 SECURECRT 做為串列埠操控台,下達 LINUX 的啟動指令。


2.1 設定 FEDORA 15

這裡說明 FEDORA 15 NFS 的設定工作,。

編輯檔案 etc/idmapd.conf,將 Domain 參數的註解去除。

etc/idmapd.conf
01 Domain = local.domain.edu

編輯檔案 etc/exports,設定 NFS 的分享目錄。

etc/exports
01 #write the folowing statement
01 /opt/FriendlyARM/mini2440/rootfs_qtopia_qt4 *(rw,sync,no_root_squash)
01 # /opt/FriendlyARM/mini2440/rootfs_qtopia_qt4 is shared directory
01 # * means all client can mount this directory
01 # rw means read write are allowed
01 # no_root_squash means client is root

編輯檔案 etc/profile.d/arm-linux.sh,設定編譯器路徑。 之後,執行 $source /etc/profile.d,重新掃描目錄中的描述檔,啟用 ARM 交叉編譯器路徑。

etc/exports
01 #add path filefor arm linux gcc 4.4.3
01 export PATH=/opt/FriendlyARM/toolschain/4.4.3/bin:$PATH

到 etc/rc.d/init.d 執行 ./rpcbind start,這個步驟不一定需要,因為系統可能已經啟動。

01 etc/rc.d/init.d/rpcbind start

到 etc/rc.d/init.d 執行 ./nfslock start,這是用來保證 NFS 文件存取的一致性,這個步驟不一定需要。

01 etc/rc.d/init.d/rpcbind start

到 etc/rc.d/init.d 執行 ./nfs start,啟動 NFS 服務。

01 etc/rc.d/init.d/nfs start

當不需要再使用到 NFS,可以關閉 NFS。 此時可以到 etc/rc.d/init.d 執行 ./nfs start,停止 NFS 服務。

01 etc/rc.d/init.d/nfs stop

接下來,按住開發板上的任意按鍵,打開開發板電源,準備啟動 LINUX。


2.2 啟動開發板

在 MINI2440 上使用 NANDFLASH 啟動開發板,壓著開發板上的任意按鍵,再打開電源,就可以進入 SUPERVIVI 的選單。 鍵入 q,執行 vivi 的命令列。 將 NFS.TXT 做稍微的修改,之後複製檔案內容,貼到 SECURECRT。這是給 LINUX 的啟動參數,告訴 LINUX 要從 NFS 啟動根文件系統。

01 +---------------------------------------------+
01 | S3C2440A USB Downloader ver R0.03 2004 Jan  |
01 +---------------------------------------------+
01 USB: IN_ENDPOINT:1 OUT_ENDPOINT:3
01 FORMAT: +++
01 NOTE: Power off/on or press the reset button for 1 sec
01       in order to get a valid USB device address.
01 
01 NAND device: Manufacture ID: 0xec, Chip ID: 0xda (Samsung K9F2G08U0B)
01 Could not found stored vivi parameters. Use default vivi parameters.
01 
01 ##### FriendlyARM BIOS 2.0 for 2440 #####
01 [x] format NAND FLASH for Linux
01 [v] Download vivi 
01 [k] Download linux kernel 
01 [y] Download root_yaffs image 
01 [a] Absolute User Application
01 [n] Download Nboot for WinCE 
01 [l] Download WinCE boot-logo
01 [w] Download WinCE NK.bin 
01 [d] Download & Run 
01 [z] Download zImage into RAM 
01 [g] Boot linux from RAM 
01 [f] Format the nand flash 
01 [b] Boot the system 
01 [s] Set the boot parameters 
01 [u] Backup NAND Flash to HOST through USB(upload) 
01 [r] Restore NAND Flash from HOST through USB 
01 [q] Goto shell of vivi 
01 [i] Version: 1026-2K
01 Enter your selection: q
01 Supervivi> 

將 NFS.TXT 做稍微的修改,之後複製檔案內容,貼到 SECURECRT。這是給 LINUX 的啟動參數,告訴 LINUX 要從 NFS 啟動根文件系統。
下面命令列的內容是在同一行上。

01 Supervivi> param set linux_cmd_line "console=ttySAC0 root=/dev/nfs 
01 nfsroot=192.168.0.224:/opt/FriendlyARM/mini2440/rootfs_qtopia_qt4 
01 ip=192.168.0.10:192.168.0.224:192.168.0.224:255.255.255.0:sbc2440.arm9.net:eth0:off"
01 Change linux command line to "console=ttySAC0 root=/dev/nfs 
01 nfsroot=192.168.0.224:/opt/FriendlyARM/mini2440/rootfs_qtopia_qt4 
01 ip=192.168.0.10:192.168.0.224:192.168.0.224:255.255.255.0:sbc2440.arm9.net:eth0:off"

鍵入 boot,啟動 LINUX。
下面的啟動訊息中,05.06.07 是在同一行。

01 Supervivi> boot
02 Copy linux kernel from 0x00060000 to 0x30008000, size = 0x00500000 ... done
03 zImage magic = 0x016f2818
04 Setup linux parameters at 0x30000100
05 linux command line is: "console=ttySAC0 root=/dev/nfs 
06 nfsroot=192.168.0.224:/opt/FriendlyARM/mini2440/rootfs_qtopia_qt4 
07 ip=192.168.0.10:192.168.0.224:192.168.0.224:255.255.255.0:sbc2440.arm9.net:eth0:off"
08 MACH_TYPE = 1999
09 NOW, Booting Linux......
10 ...
11 TCP cubic registered
12 NET: Registered protocol family 17
13 s3c2410-rtc s3c2410-rtc: setting system clock to 2138-05-22 16:47:26 UTC (1018865950)

LINUX 啟動過程中,開啟網路,嘗試連結 NFS。連結成功時,出現 "NFS root ...Done" 訊息。

01 eth0: link down
01 IP-Config: Complete:
01      device=eth0, addr=192.168.0.10, mask=255.255.255.0, gw=192.168.0.224,
01      host=sbc2440, domain=, nis-domain=arm9.net,
01      bootserver=192.168.0.224, rootserver=192.168.0.224, rootpath=
01 Looking up port of RPC 100003/2 on 192.168.0.224
01 eth0: link up, 100Mbps, full-duplex, lpa 0x45E1
01 Looking up port of RPC 100005/1 on 192.168.0.224
01 VFS: Mounted root (nfs filesystem) on device 0:11.
01 Freeing init memory: 156K
01 hwclock: settimeofday() failed: Invalid argument
01 [15/Apr/2002:10:19:18 +0000] boa: server version Boa/0.94.13
01 [15/Apr/2002:10:19:18 +0000] boa: server built Jul 26 2010 at 15:58:29.
01 [15/Apr/2002:10:19:18 +0000] boa: starting server pid=680, port 80
01                         
01 Try to bring eth0 interface up......NFS root ...Done
01 
01 Please press Enter to activate this console. 

LINUX 啟動完成中,從 SECURECRT 按任意鍵,進入命令列。 使用命令 ls 顯示目錄,此目錄就是 FEDORA 主機上的 /opt/FriendlyARM/mini2440/rootfs_qtopia_qt4。 進入 /home/bookysc,執行 hello,程式會輸出 "hello, FriendlyARM!"。 hello 是一個在 FEDORA 主機上編譯的執行檔,透過 NFS,傳遞到開發板上的 ARM LINUX 系統執行。

這是一個很方便的嵌入式系統開發方式。 開發者不需要再 ARM LINUX 環境中撰寫或編譯程式,只要在 FEDORA 系統中進行程式的撰寫與編譯,之後,透過 NFS 就可以在開發板上執行程式的驗證工作。

01 Please press Enter to activate this console. 
01 [root@FriendlyARM /]# ls
01 bin      etc      lib      mnt      proc     sbin     tmp      var
01 dev      home     linuxrc  opt      root     sys      usr      www
01 [root@FriendlyARM /]# cd home
01 [root@FriendlyARM /home]# cd bookysc
01 [root@FriendlyARM bookysc]# ls
01 hello
01 [root@FriendlyARM bookysc]# ./hello
01 hello, FriendlyARM!
01 [root@FriendlyARM bookysc]# 


3 MINI2440 驅動程式

在 LINUX 原始碼根目錄,執行 make menuconfig,出現目錄畫面。

使用上下鍵,將目錄移到 Device Drivers。按下 Enter,進入 Character devices。

s3c2440

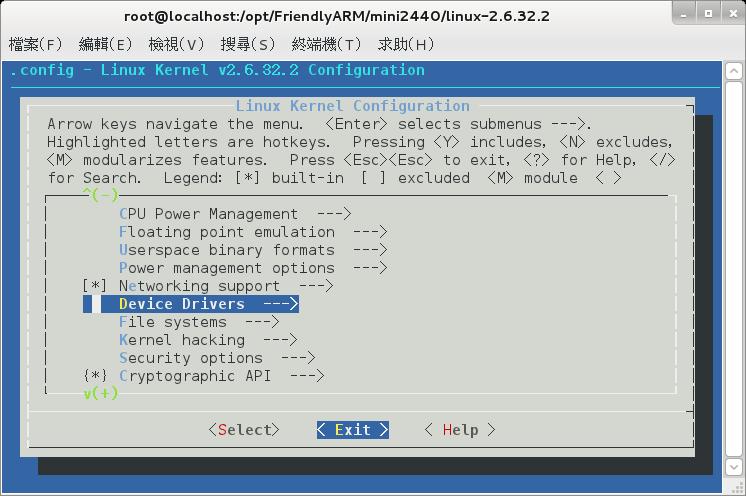
使用上下鍵,將目錄移到 Character devices。

s3c2440

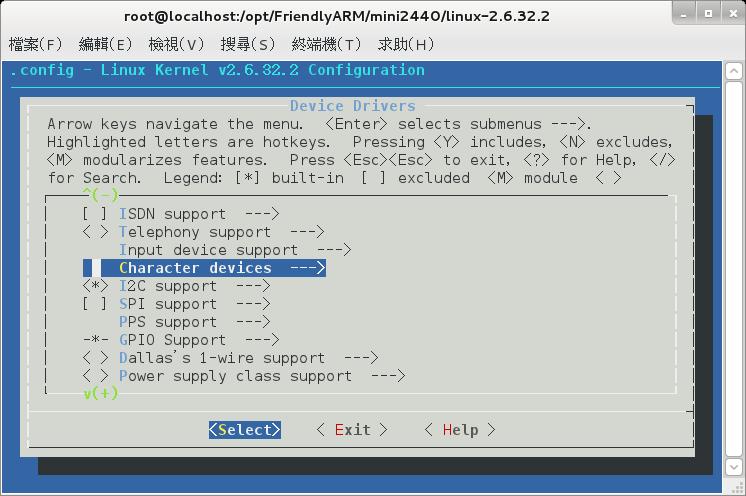
這是 Character devices 目錄。
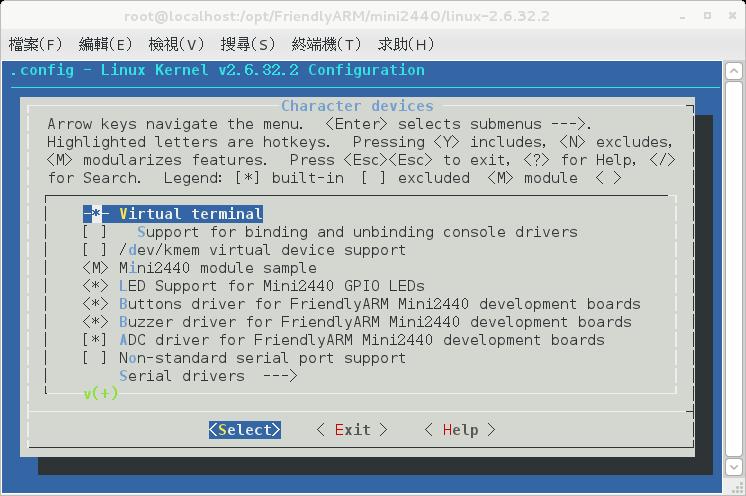
可以看到。
<M> MINI2440 MODULE SAMPLE
<*> LED drvier
<*> BUTTONS drvier
<*> BUZER drvier
<*> ADC drvier

這幾個是 MINI2440 已經撰寫好的驅動程式。
M 表示這是外部模組,不會編進核心內。必須透過 make modules 編譯,在透過 insmod 載入核心。
* 表示內部模組,會直接編進核心。

s3c2440